Categories
Customer Contacts Troubleshooting Help

Diagnosing TiVo Power Supply Problems

We’ve got a pretty extensive TiVo troubleshooting page on our site, but I thought I’d recap about the issues specific to power supplies, because we get a lot of questions about these.
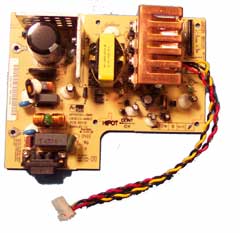
The primary symptom of a bad power supply is getting no video out of any output port. That includes the gray screen – if you get even a gray screen, likely you don’t have a bad power supply. You need to get no video out at all – not even a flicker on your TV screen when you power up the TiVo.

But people often are convinced that the power supply is OK even without video, for some other reason. So here is a list of problems that people report that are all still consistent with problematic power supplies. If you have any of these same occurrences, you can still have a bad power supply – we see it all the time:

  • Fan still spins
  • Drive spins up
  • Drive power leads test to proper voltage (5V and 12V)
  • Lights illuminate on the TiVo faceplate

Customers often ask, “If one or more of the above is taking place, how could the power supply be bad?” Well, in many cases, when a power supply is bad, none of the above take place. But power supplies fail in different ways. The connector that delivers power to the drives uses different components on the motherboard than the flat white (parlex) cable that delivers power to the motherboard. And that cable holds several connectors, so sometimes there is a failure of some power delivery through it to certain components (like the processing chips) but not to the fan.

In short, the best way to diagnose a bad power supply is the video test: no video = bad power supply. Then, the best way to check that is to install a replacement power supply. Our power supplies are returnable subject to our normal terms.

We now have replacement TiVo power supplies for almost every model out there.

Categories
Troubleshooting Help

Troubleshooting TiVo Network Transfers: Part 2

In Part 1, we posted about problems where networked TiVos can’t transfer shows because they don’t realize they have been authorized to transfer. This segment deals with a common network problem: different subnets.

A “subnet” is an isolated area of a network, generally with an IP address list in a reserved area of the IP space specifically for networks behind gateways and/or routers. This is extremely common in homes and small offices – almost all home networks use subnets. Essentially, in addition to adding security to the network, this also enables several network devices to share one public IP address to communicate with the outside world.

The router, then, creates a table of the local IP addresses, and figures out what traffic from the outside internet goes to what computer or other network device on the inside network. This inside network is where computers typically have lower security enabled, which allows computers to share files, printers, etc.

For two TiVos to talk across a network, they need to be on the same subnet. They scan this internal area to see what other DVR is out there, and they check to see if both units are on the same account and if each has “Allow Transfers” enabled (see previous post).

So if your Now Playing List doesn’t contain entries for the other TiVo(s) on your network at the very bottom, then it’s possible they aren’t on the same subnet.

To determine this, go to your TiVo Central -> Messages & Settings -> Settings -> Phone & Network. On that screen, first verify your subnet mask. Essentially, this “mask” tells your device that if certain other devices have similar IP addresses to this one, then they are “local” and they don’t need to go through a gateway to talk to each other.

The most common subnet mask, and the only one we’ll cover here, is 255.255.255.0. In almost all cases, this will be what your TiVo shows. What this basically says is, if the first three sets of numbers (octets) between the dots are the same on another device as they are on this one, that other device is on the same subnet, or local.

Now, assuming your shows 255.255.255.0, then make sure that, in fact, you are on the same subnet. So see if your IP address (in the area marked “IP addr.:”) is the same as that of the other TiVo DVR, except for the numbers after the final dot. Also be sure they both have the same information for their routers.

What should you do if they aren’t on the same subnet, as evidenced by these numbers? Most likely, that means you’re on two different wireless networks. If you’re using wireless, you should check the network names. If the names are generic (like “linksys”) it may mean that there are two networks with the same name floating around in that area. If that’s the case, reconfigure your router with a unique name (and, you should be using WPA also, to keep hackers off your network).

In some cases, you can show the right information on each unit, and still you aren’t on the same network. That’s because in the subnet world, the internal IP addresses are reused. Most start with 192.168 for the first two octets. So it’s possible the two TiVos are on different networks that use the same subnet set. If that’s possible, and it’s not a WiFi issue (see above) then you may be plugged into different networks in the same location. The best test of this is to hardwire each unit to the same router, and reboot each.

Categories
Troubleshooting Help

Troubleshooting TiVo Network Transfers: Part 1

There are two main reasons Multi Room Viewing can fail. Multi Room Viewing, or MRV, is the ability of Series2 and Series3 TiVo DVRs to see each other over the network and be able to transfer shows between each other (or, potentially, with more TiVos, if there are more on the network).

The first of the two main reasons why this ability fails to work is that the TiVo doesn’t realize it has been authorized to transfer, or, in fact, it hasn’t been authorized to transfer. To set this ability, you have to login to your TiVo.com account and select the DVR preferences area under “Manage my account.”

From here, be sure that “Allow Transfers” is checked for each DVR on the account. If the option isn’t available for a DVR, that means that the DVR in question doesn’t support networking.

If your unit already has this option checked, then you may need to “refresh” the unit to be sure it’s fully communicating with the TiVo server. This loss of communication can occur with a hard drive change or an OS update or for various other reasons.

To “refresh” the setting, uncheck the “Allow Transfers” preference for the DVR in question on this screen. Then choose the “Save Preferences” button.

Next, on the TiVo itself, force a connection over the network to the TiVo servers. To do this, navigate to TiVo Central -> Messages & Settings -> Settings -> Phone & Network and then choose the option “Connect to the TiVo service now.” After that is complete, the TiVo should learn that it cannot transfer shows. 

Now, enable transfers again on the TiVo.com website, and save the preference again. Then force another connection from your TiVo to the server.

See if other TiVos show in your Now Playing List at this point.

If that doesn’t do the trick, watch for our next blog post about troubleshooting network problems.

Categories
TiVo News

Switched Digital Video on TiVo is Progressing

Today TiVo announced that they have submitted their software for using Switched Digital Video (SDV) to CableLABS for testing. They use an external “tuning resolver” which is a device that talks back to the cable company to tell the head end what stations to send down the pipe.

SDV confronts many users in certain cable markets, especially Hawaii. Likely, more and more cable providers will begin to use SDV as they try to supply ever larger numbers of HD channels down the same cable pipe.

More information is at TiVo’s site. No word, yet, on whether this will also cover On-Demand programming.

Categories
WeaKnees News

Old Episode of The Screen Savers on YouTube

Yup, years ago we were TV stars. Wow – it’s only four years old, but, for us, it’s a blast from the past.